TSF◇ for high tibial osteotomy
Janet Conway, MD; Sinai Hospital, Baltimore, MD
The views and opinions expressed in this section are those of the surgeon.

Introduction
There are many options for performing a high tibial osteotomy.1-4 External fixation and gradual correction has many advantages in these cases. Near immediate full weight bearing is possible and allows for accurate post-op adjustments to achieve the exact mechanical axis for successfully unloading the medial compartment. The medial opening wedge is regenerate bone that is stimulated to heal with full weight bearing. The typical time for external fixation wear is four to five months with activity restrictions limited to impact sports only.
Radiographic evaluation
Standing assessment reveals bowing of one or both legs. Medial knee pain is present upon joint line palpation. With chronic meniscal tears, joint swelling is common. Joint line laxity is present secondary to the loss of medial joint space and the lateral collateral ligament laxity that occurs from chronic stretching. Tibial rotational assessment is important. Any excessive external or internal rotation must be corrected. Joint range of motion is documented and it is important to note any lack of full extension of the knee or ankle equinus. These issues when noted can be addressed at the surgical setting with a gastrocnemius recession or planning some extension into the frame correction.
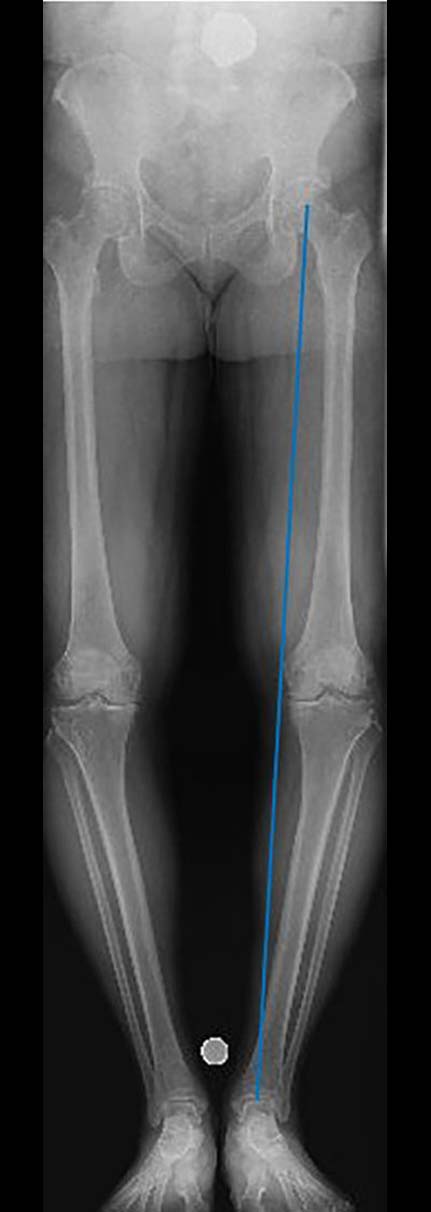
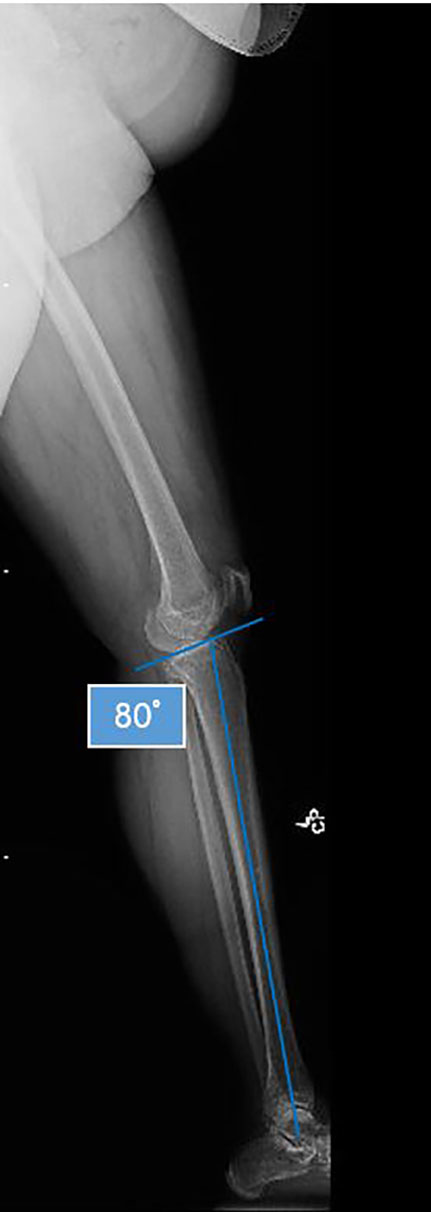
Standing full limb radiographs are taken. The mechanical axis of the whole limb is assessed with a line drawn from the center of the femoral head to the center of the ankle. With medial-compartment osteoarthritis (MCOA) or varus tibiae this line falls entirely within the medial compartment when compared to normal alignment which is entirely within 1cm of the center of the knee joint. A long lateral radiograph assesses the sagittal plane alignment. The normal posterior proximal tibial angle is 80˚ (Figures 1a and 1b). Anything less than this is considered pro-curvatum and can be corrected with the gradual external fixator.
MRI imaging of the knee is essential for pre-operative evaluation. Any asymptomatic lateral joint line pathology is detected as well as any patella-femoral joint pathology. The medial joint line will be narrowed with cartilage loss and associated meniscal tear.
Determining the degree of correction
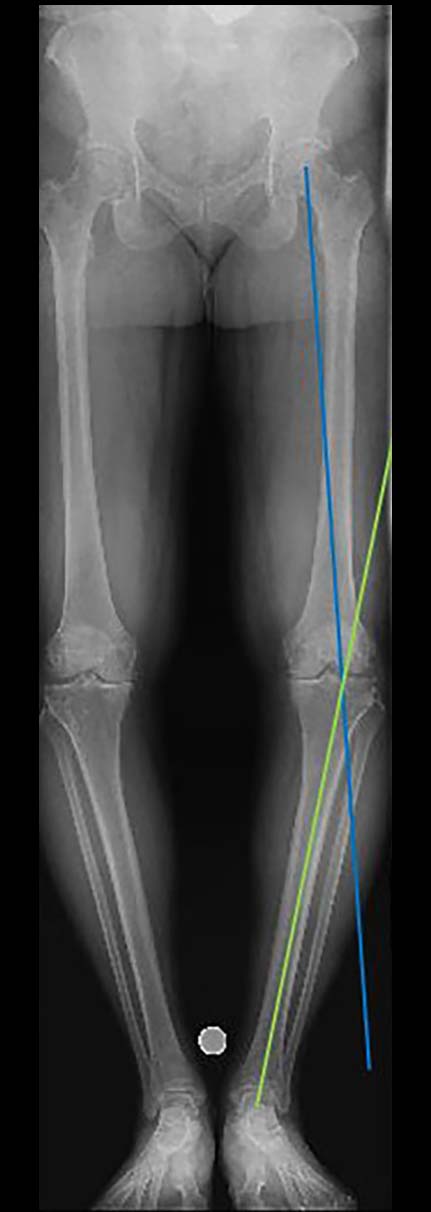
Minimal, moderate and severe MCOA can be addressed using varying degrees of correction. The mechanical axis is shifted laterally according to the degree of arthritis. The maximum correction is to a point just lateral to the lateral tibial spine. Minimal or moderate correction can be to the center of the knee joint or slightly lateral to the lateral tibial spine respectively. The pre-operative standing leg radiograph is used for planning.
A line representing the new mechanical axis is drawn from the center of the femoral head to the desired correction point – for example just lateral to the lateral tibial spine.
A second line is drawn from the center of the ankle up through the mid-shaft tibia and extending proximally.
The angle this line creates is the angle of correction that will be placed into the deformity parameter section of the SMART TSF◇ software (Figure 2).
Knee arthroscopy is performed at time of surgery.
A distal tibio-fibular screw (Figure 3a) is inserted at the level of the distal syndesmosis, angled proximal medial to distal lateral.
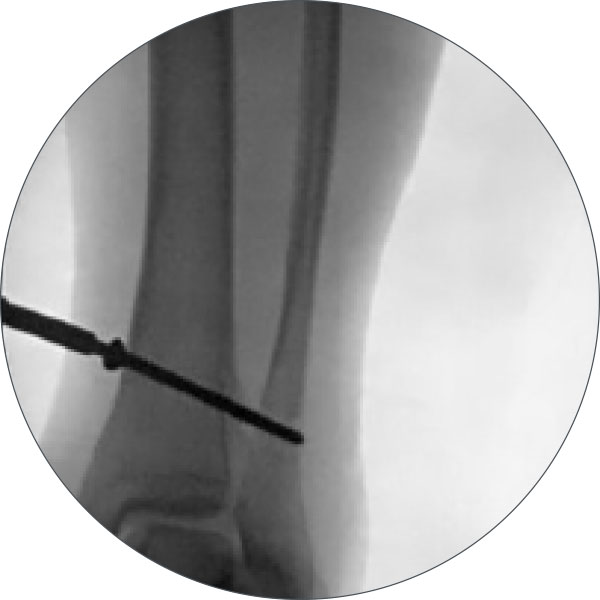
Perform the fibular osteotomy (Figure 3b) at the level of the mid-shaft fibula. This is a 3-4cm incision overlying the lateral fibula using the interval between the gastrocsoleus muscle complex and the peroneals. Utilizing this corridor minimizes bleeding. The fibula is exposed and a 1.8mm Wire or small drill is used to mark out the oblique fibular osteotomy. The osteotomy is pre-drilled anterior proximal to distal posterior. This creates an oblique osteotomy that maximizes surface area for healing and allows the bone ends to slide past each other with the varus to valgus correction. Confirm under fluoroscopy that the osteotomy can 100% translate to avoid an incomplete osteotomy. Pack the wound and close at the end to allow for hemostasis and prevention of a hematoma.
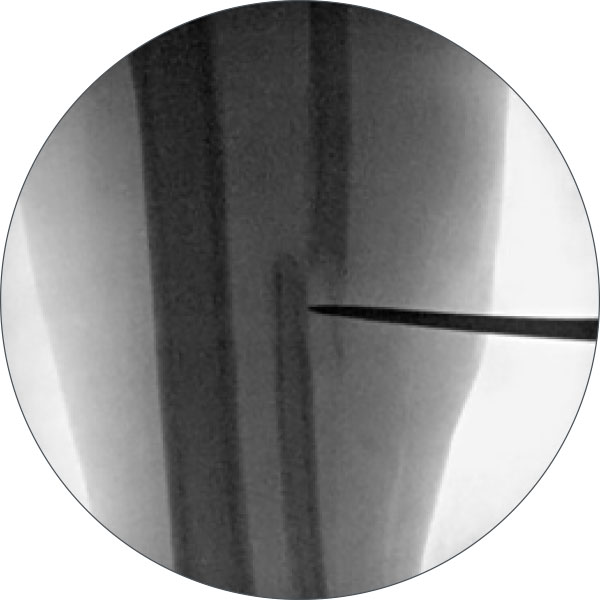
Mark the level of the osteotomy (Figure 3c) for the tibia using a wire and a marking pen This should be approximately 4-5cm below the level of the top of the fibula.
Determine Ring size. A 2/3 Ring allows flexion of the knee.
Insert a Reference Wire. Place a 1.8mm Wire just anterior to the fibula only capturing the tibia. The Wire should be placed parallel to the knee joint with the patella facing forward as well as parallel to the floor. Tension the wire to 110kgs.
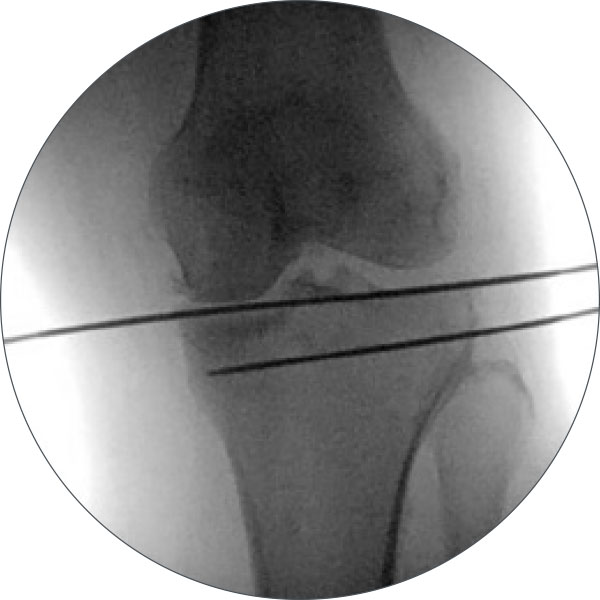
Mount the Proximal 2/3 Ring (Figure 3d) at the level of the head of the fibula. The entire frame needs to be mounted with the patella facing forward. The Ring should be fixed proximal to the Wire. This allows for maximum pin/wire fixation proximal to the osteotomy.
Add additional fixation. Select a 2 Hole Rancho Cube or Pin Fixation Clamp and place it directly anteriorly on the Master Tab in the center hole. Before placing this pin, ensure that there is adequate room on the medial/lateral side of the Ring for the soft tissue. Adjust accordingly by tapping the Ring over on the Wire. Now make sure that the Two Hole Rancho Cube will still capture the bone. This can be done manually or with fluoroscopy. Use the lateral C-arm shot to correctly place the pin mounting the frame orthogonally in the sagittal plane. Proper sagittal alignment is when the Ring is tilted 10° to the joint line. Once the frame is aligned correctly drill and place the pin. Adjustments can be made to the sagittal alignment with the 4.8mm Drill in place by adjusting your hand before the second cortex is drilled. Self-drilling pins are not recommended and hydroxyapatite-coated pins are preferred to help prevent pin loosening and infection. Place the pin and use the C-arm to check that it has bi-cortical purchase. Once it is placed fix it to the Rancho Cube with two Set Screws or 8mm Bolts. Now the proximal Ring is mounted. Remaining fixation will be placed after the second Ring is mounted.
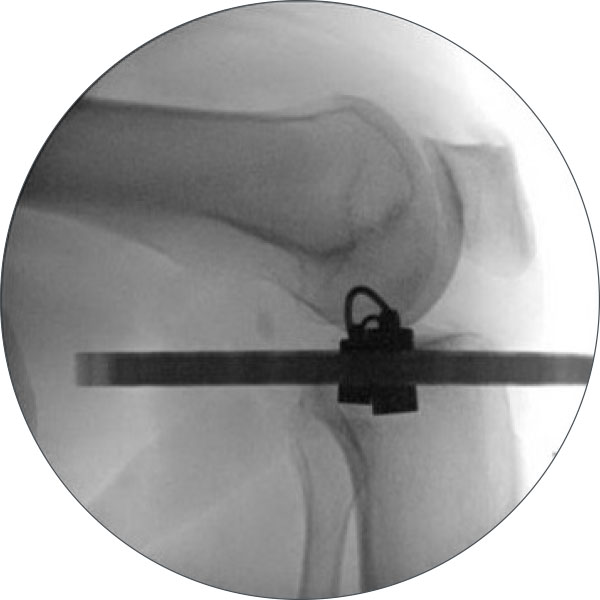
Mount the second Ring (Figure 4a). This can be placed anywhere along the distal portion of the limb. Using a Medium Strut with the length at the mid-point is a good general guide to where the second Full Ring will be mounted. This setting allows for adjustments to be easily made after the frame is mounted without having to do a Strut change early in the correction phase. Mark the AP and LAT center of the second Ring using bolts. Ensure there is proper clearance of the Ring around the soft tissues. Mount the Ring with a transverse Wire placed parallel to the floor and perpendicular to the tibial bone on the AP projection. Be careful to keep the patella forward during mounting of the distal Ring as well if you are not planning rotational correction. If you are planning rotational correction, consider mounting the distal Ring orthogonal to the foot with the foot forward instead of the patella. Fix the Ring to the leg in a similar fashion as the proximal Ring to ensure that the frontal and coronal plane alignment are correct. Tension the Wire to 130kgs. Center the Ring on the leg with respect to the soft tissues. Once the Ring is accommodating medially and laterally, use a Three Hole Cube to fix the Ring in the sagittal plane. Place this Cube distal to the Ring and check the lateral X-ray to ensure that the Pin is placed perpendicular to the tibial shaft. Place the Pin and secure in the Cube.

Place six Medium Struts (Figure 4b) in their positions. The author’s preference is for Standard Struts. Note the initial Strut settings and size for the frame planning schedule. After the osteotomy you will verify that these numbers are the same.
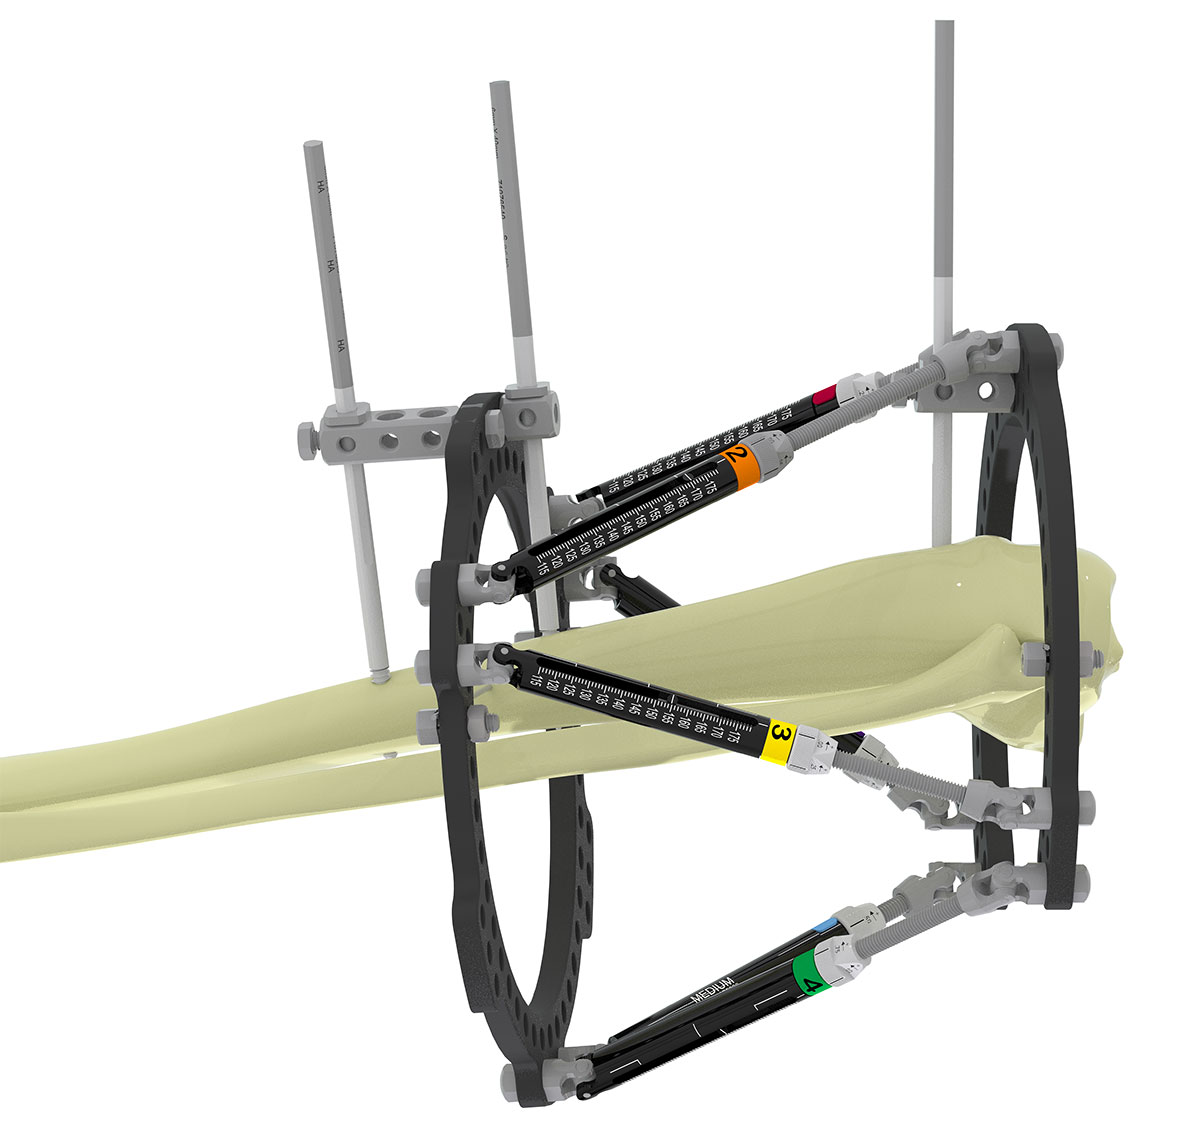
Add additional fixation (Figure 4c). This includes two more Half Pins proximally and two more Half Pins distally. The proximal ring can accommodate a One Hole Cube with a washer and a Pin Fixation Bolt. The distal Ring can accommodate two more Pins inside the Ring.
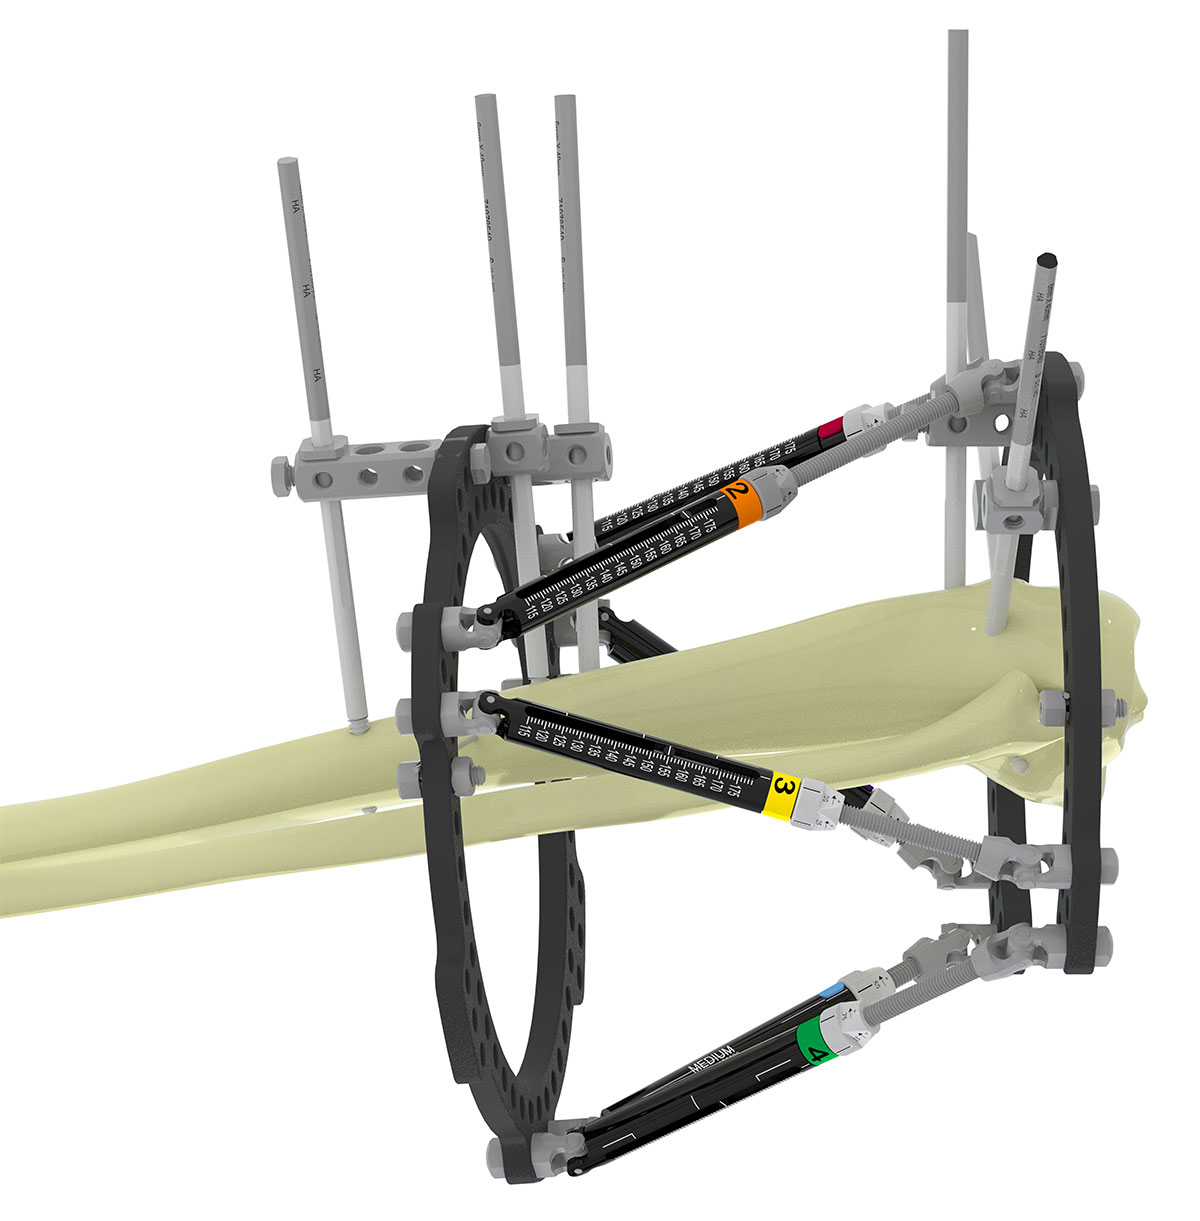
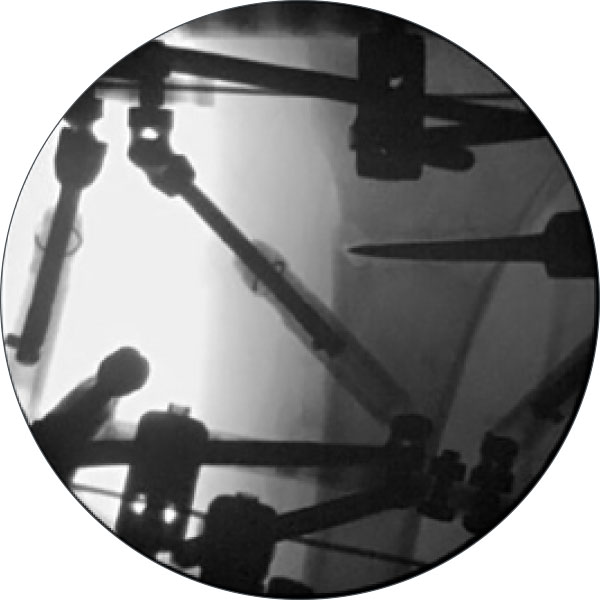
Perform the osteotomy (Figure 4d) 4cm distal to the proximal Ring using multiple drill holes and an osteotome. Ensure the osteotomy is complete by detaching the Struts from one of the Rings and counter-rotating the Rings. If the Rings do not rotate freely, the osteotomy is not complete. Once complete, re-attach the Struts back up and check to make sure the osteotomy is not displaced on the fluoroscopy and the Strut numbers are the same as noted previously.
All wounds are closed. Antiseptic-soaked IlizarovTM Sponges are placed around the Pins and 4x4s are stuffed into the frame to help control swelling with a stockinette around the frame to hold them in place.
Software
HTO serves to re-align the axis of the limb, rather than correcting a bony deformity. Essentially a deformity is created in order to shift the axis. The Osteotomy Sandbox in SMART TSF◇ serves as a useful tool to perform the virtual osteotomy and measure the extent of angular correction needed (Figure 5).

Osteotomy Sandbox can be found in the Resources section of smart-TSF.com
- Full limb standing X-rays are uploaded to Osteotomy Sandbox. The images must have a means of calibrating them.
- Joint Lines and a mechanical axis can be drawn.
- The SuperDot method can be used to perform a virtual cut.
- The moving fragment is picked up and re-positioned on the desired axis.
- The measured deformity is entered post-operatively on the Deformity tab in the Software.
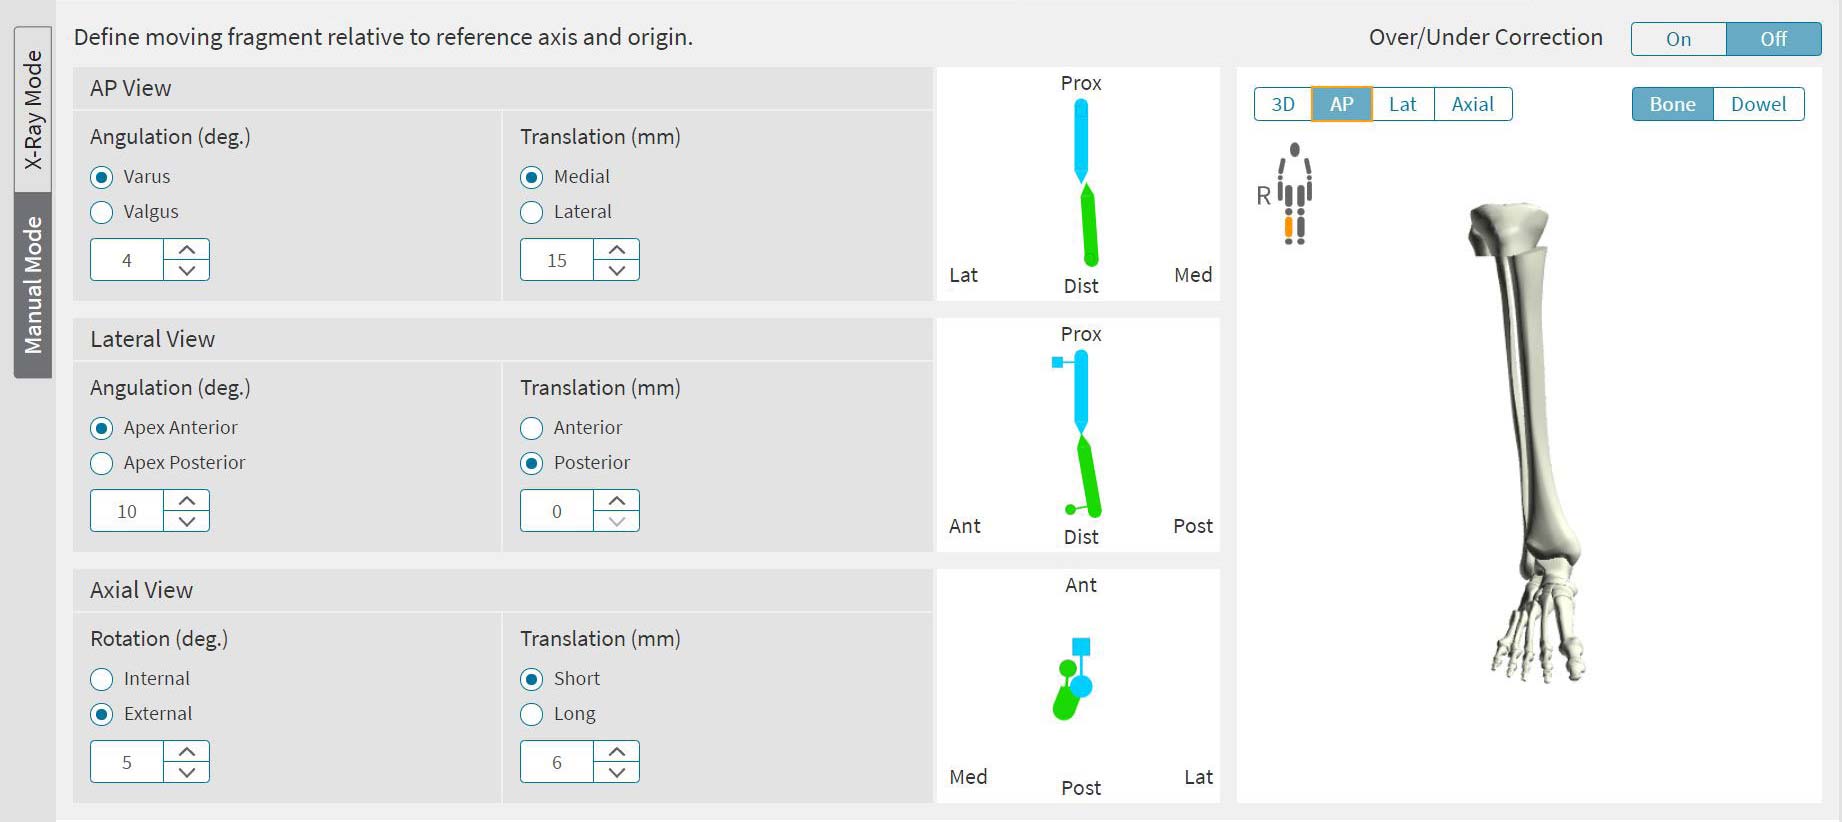
- AP Angulation is typically 10-16˚ of varus.
- AP Translation is typically 5mm-10mm medial.
- Rotation is based upon pre-operative clinical assessment.
- Lateral Angulation is entered as 10˚ Apex Anterior, as frames always go into pro-curvatum. Planning the pro-curvatum ahead in the initial frame schedule prevents multiple residual corrections.
- Lateral Translation is usually zero.
- Axial Translation of 5-10mm Short allows clearance of the moving fragment relative to the reference, and can be applied before or in conjunction with any angular movement.
Using Osteotomy Sandbox for pre-operative planning
Import a full leg X-ray into the Osteotomy Sandbox. The Cobb Angle Tool is used to measure the deformity. The first line is drawn from the center of the femoral head through the knee, or more correctly the lateral tibial spine.
The second line is drawn from the center of the ankle through the knee. The Joint Line Tool can be used to define the correct axis.
Figure 6 shows these lines intersect in the mid-femur, representing the CORA. Using Osteotomy Rule 2, the planned osteotomy will be 4-5cm distal to the top of the fibula.
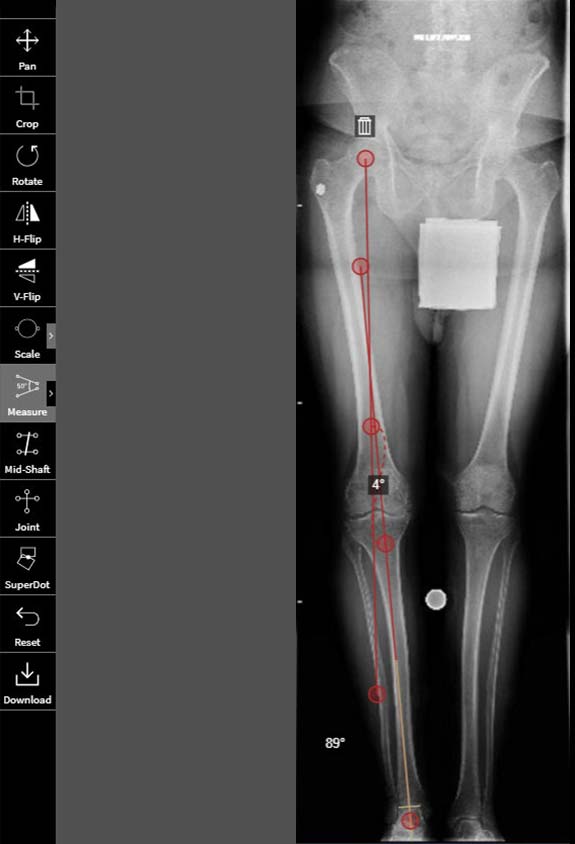
Use the SuperDot tool to simulate the osteotomy. Divide AP image at osteotomy, capturing the moving fragment, in this case the distal fragment.
Place the Super Dot axis over the axis of the moving fragment. Using the handles, move the fragment into position until the Super Dot axis aligns with the axis of the reference fragment (Figure 7).
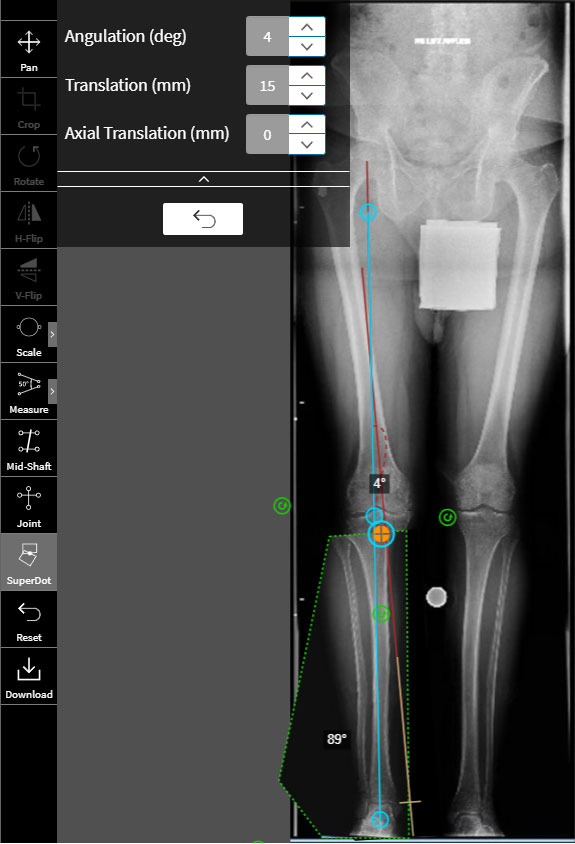
The same analysis can be performed on the Lateral view if there is deformity in the coronal plane. As frames almost always go into pro-curvatum, it is a good idea to assume 10° of Apex Anterior in deformity planning and resist the drift into pro-curvatum. Additionally 5-10mm Short is typically programmed.
Rotation is a clinical assessment.
Once the TSF◇ is applied the known deformity parameters measured pre-operatively are programmed using the classic Origin and Corresponding Point method (Figure 8).
Note
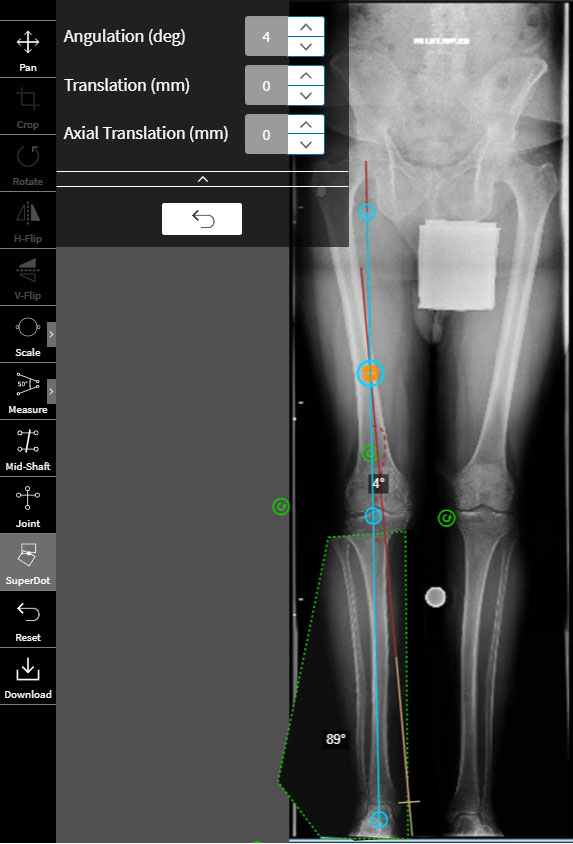
Placing the SuperDot at the center of the osteotomy is the most reproducible landmark to find on the Lateral image. As this is Osteotomy Rule 2, translation occurs, and the SMART TSF software measures this.
The SuperDot can alternatively be placed at the CORA, as shown in Figure 9. The drawback with this strategy is potential difficulty in placing the SuperDot at the same location on the Lateral image.
Post-op considerations
The patient can perform range of motion of the knee and ankle and weight bear as tolerated on the limb. Pin care is with Hexagonal sponges and saline. Showers with antibacterial soap are allowed after the stitches or staples are removed and the pin care is performed following showers. Physical therapy is three times per week and is for range of motion of the knee and gait training. DVT prophylaxis is recommended for four to six weeks. Post-operative visits are scheduled two weeks post-operatively and then weekly until the correction is perfect on the standing erect leg and long lateral radiograph. Radiographs are performed monthly following the achievement of the correction until the bone is consolidated. Prior to frame removal, the frame can be dynamized to reduce the tension in the device and allow the bone to experience more load for one month prior to removal. The average frame time is four to five months. Once the bone has healed the frame is removed under anesthesia as an outpatient. Weight bearing following frame removal is 50% for two weeks followed by 100% for two weeks. This is allowed with the use of crutches for one month. This is to prevent any fractures through the pin sites while they remodel. After one month, physical therapy is continued until the patient is strong enough to resume all of their desired activities.
References
- Noyes FR, Mayfield W, Barber-Westin SD, Albright JC, Heckmann TP. Opening Wedge High Tibial Osteotomy. The Amer J of Sports Medicine. 2006;34(8.):1262-1273.
- Villatte G, Erivan R, Fournier PL, Pereira B, Galvin M, Descamps S, Boisgard S. Opening-wedge high tibial osteotomy with a secure bone allograft (OsteopureTM) and locked plate fixation: Retrospective clinical and radiological evaluation of 69 knees after 7.5 years follow-up. Orthopaedics & Traumatology: Surgery & Research. 2015;101:953-957.
- Van Houten AH, Heesterbeek PJC, van Heerwaarden RJ, van Tienen TG, Wymenga AB. Medial Open Wedge High Tibial Osteotomy: Can Delayed or Nonunion Be Predicted? Clin Orthop Relat Res. 2014; 472:1217-1223.
- Warden SJ, Morris HG, Crossley KM, Brukner PD, Bennell KL. Delayed- and nonunion following opening wedge high tibial osteotomy: surgeons’ results from 182 completed cases. Knee Surg Sports Traumatol Arthrosc. 2005;13:34-37.
