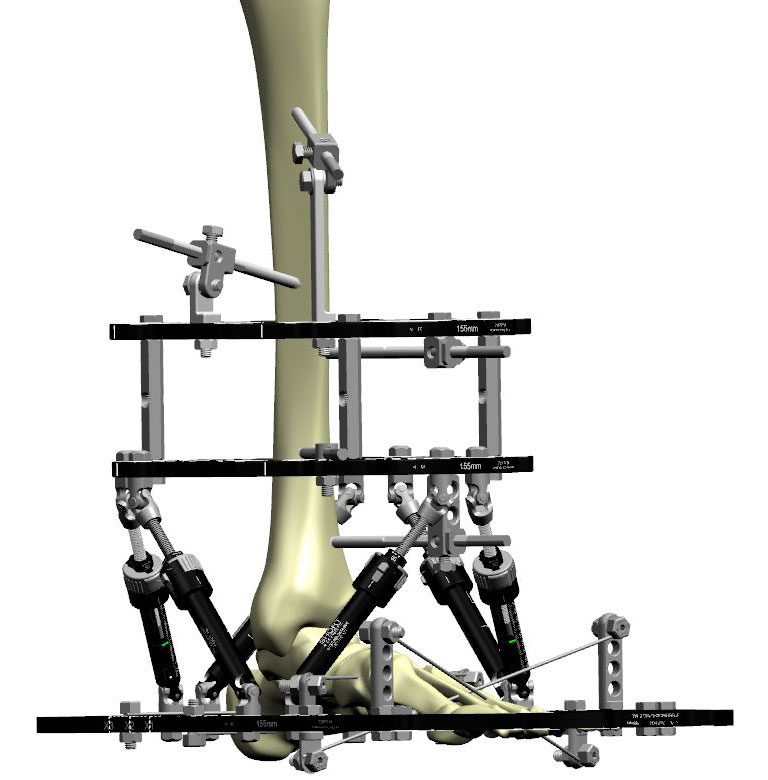
Ankle arthrodesis with TSF◇
LTC Justin Orr, MD; William Beaumont Army Med Center, El Paso, TX
The views and opinions expressed in this section are those of the surgeon.

Introduction
Current recommendations for primary and revision tibiotalar joint arthrodesis favor internal compression techniques using screw and/or plate internal fixation, with satisfactory outcomes being reported for most patients. Similarly, when there is concomitant subtalar joint arthritis, current recommendations for primary and revision tibiotalocalcaneal (TTC) arthrodesis favor screw and/or plate internal fixation or retrograde TTC intramedullary nailing. Favorable union rates and outcomes for primary and revision tibiotalar arthrodeses have been reported using circular fixation techniques.1,2 In select patients, ankle and TTC arthrodesis with internal fixation may be limited or even contraindicated given insufficient bone stock to adequately support implants, an abundance of avascular bone, a history of deep infection or osteomyelitis, in cases of prior failed total ankle replacement with significant osseous defects, or in cases when previous ankle or TTC arthrodesis has failed. Ring fixation may facilitate clinically acceptable limb salvage in these complex cases.
Circular Fixation for Ankle Arthrodesis
The most common indication for ankle arthrodesis is severe, destructive arthritis that fails non-operative management, most commonly post-traumatic in origin. Regardless of the method of fixation, ankle arthrodesis is contraindicated in patients with peripheral vascular disease until adequate circulation for healing can be re-established. Absolute indications for arthrodesis include ankle arthritis associated with neuropathy, extensive avascular necrosis of the talus and/or distal tibia, severe coronal or sagittal plane deformity and non-reconstructable ankle ligament insufficiency. Joint-sparing procedures may be favored when ankle arthritis is associated with ipsilateral hindfoot arthritis or a contralateral ankle or TTC arthrodesis.
External fixation may confer advantages over internal fixation in several situations, specifically:
- History of septic arthrosis or osteomyelitis
- Compromised soft tissue envelope about the ankle
- Inadequate bone stock at the arthrodesis site to support internal fixation limited to the tibia and talus
- Leg length discrepancy that is inadequately treated with a shoe modification, requiring potential distraction osteogenesis for limb lengthening
- Failed prior ankle arthrodesis using internal fixation
- Neuropathic joint arthropathy
While contraindications to ankle arthrodesis are few, considerations relative to external fixation for ankle arthrodesis are patients with in-dwelling total joint arthroplasties, as potential pin tract infections may lead to periprosthetic infection, and sensory neuropathy of the contralateral leg, as the external fixator may cause wounds to the contralateral lower extremity unbeknownst to the patient.
Preoperative planning
Patient history, clinical evaluation, and routine ankle radiographs establish the diagnosis of symptomatic ankle arthritis. On examination, particular attention is paid to associated malalignment deformities and/or presence of ankle equinus contracture, as adjunctive deformity corrective procedures or Achilles tendon lengthening may be necessary. Weight bearing radiographs of the ankle usually confirm the diagnosis. The soft tissue envelope about the ankle and the vascular status must be evaluated. Poor soft tissues about the ankle, often secondary to trauma and/or prior surgery, typically necessitate a less invasive exposure for joint preparation. Compromised perfusion of the extremity should prompt vascular consultation to optimize the chance for union and proper soft tissue healing.
Routine weight bearing AP, mortise and lateral ankle radiographs generally suffice, but if there is any suspicion on clinical evaluation for limb malalignment or foot pathology, then mechanical axis, hip and knee, and foot radiographs should also be evaluated. CT and MRI are not routinely required.
Simply placing a tibiotalar arthrodesis in neutral plantarflexion/dorsiflexion (0°), subtle hindfoot valgus (0-5°) and avoidance of internal rotation will generally result in a functional, plantigrade foot. However, disregard for whole limb and foot alignment may lead to a poor functional outcome, despite successful ankle fusion. Limb malalignment may need to be addressed before or simultaneous to ankle arthrodesis. A powerful advantage of arthrodesis with circular fixation in the setting of proximal or distal malalignment or limb length discrepancy is that simultaneous combined procedures can be performed, such as proximal tibial corticotomy with lengthening/realignment and ankle arthrodesis or concomitant ankle and foot procedures.
Planning should include the potential for a staged procedure. Irrigation and debridement, hardware removal and infection management strategies should be planned as the first stage. If the ankle is determined to be unstable at that time, the frame may be placed for support. In a second stage, the ankle is again debrided, and compression may be applied through the ankle if there is no evidence of persistent infection. Alternatively, the plan can be for a single-stage procedure if the surgeon is satisfied that all of the infected tissue has been removed.
Operative technique
A proximal regional anesthetic typically suffices for both ankle and TTC arthrodeses using external fixation. Tourniquet (thigh) use is generally limited to the approaches for joint preparation. Circular fixation alone cannot produce fusion; proper joint preparation is essential. Therefore, if there is any concern for the perfusion of any of the joint surfaces, then the tourniquet must be released before wound closure to confirm bleeding at the arthrodesis site. Tourniquet use is not recommended during application of the frame.
The patient is positioned supine, often with a support under the hip of the operative leg. The goal is to orient the lower leg parallel to the operating table and floor to facilitate proper placement of the external fixator. A sterile proximal calf support (bump) should be created to suspend the lower leg during frame placement. The lower leg is prepared and draped in usual sterile fashion, and the leg is exsanguinated using a tension bandage unless persistent infection is suspected.
Once the joint(s) are fully exposed, attention is now turned to meticulous joint preparation. I routinely use joint distraction with either lamina spreaders or an invasive joint distractor placed over anterior smooth pins in the distal tibia and talar head-neck junction. Remaining articular cartilage is removed with a sharp elevator, osteotome or chisel. I prefer to maintain the architecture of the subchondral bone of the tibial plafond and talar dome, which facilitates easy adjustment of coronal and sagittal plane alignment without compromising limb length or bony apposition. On the contrary, flat cuts sacrifice limb length and make alignment adjustments more challenging. In the setting of malalignment, some deformity correction may need to be made through the joints with limited sacrifice of the subchondral osseous anatomy. The subchondral bone is penetrated with a drill bit and/or narrow chisel. This promotes fusion by increasing surface area, delivering autogenous bone graft to the arthrodesis site, and encouraging bridging trabeculae for fusion.
The malleoli are preserved when possible, and the medial and lateral gutters are prepared as described above to further increase the arthrodesis surface area. Autogenous or allograft bone grafting is at the discretion of the individual surgeon, but excessive use of bone graft might prevent bony apposition and should be avoided when possible.
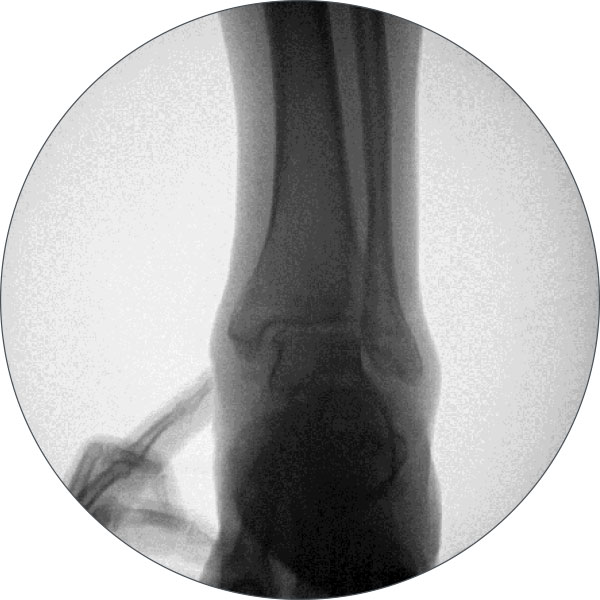
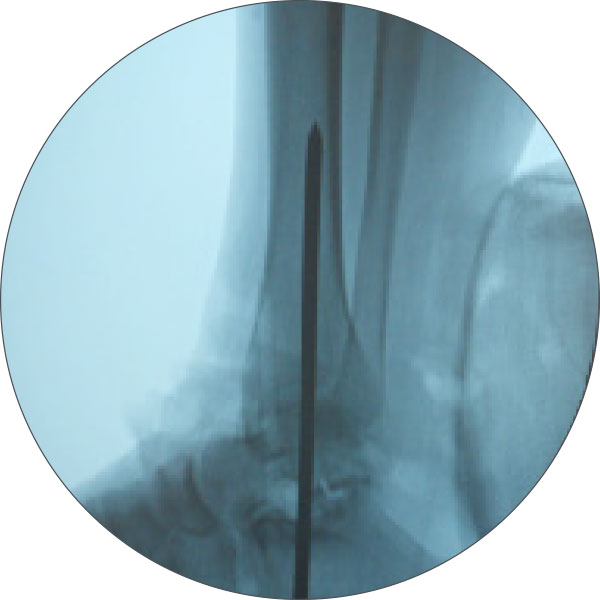
Once the joint is prepared, attention is then turned to ankle joint reduction and provisional alignment prior to application of the frame. I find that provisional fixation with one or two smooth, large-diameter Steinmann pins is often necessary to maintain ideal position prior to application of the frame (Figure 1). This pin is placed similar to the guide pin used for retrograde IM TTC nail procedures. Provisional fixation should maintain adequate reduction of the prepared talus within the prepared ankle mortise.
Optimal function and potential for fusion is established with maximum contact between the arthrodesis surfaces, avoiding anterior translation of the talus within the ankle mortise. Valgus is generally established in the hindfoot; varus malalignment at the ankle joint must be avoided. Furthermore, calcaneus or equinus positioning must be corrected to a neutral sagittal plane alignment. Finally, the second metatarsal should be in line with the tibial crest to ensure proper rotational positioning, avoiding internal rotation.
The wound is then gently irrigated and meticulously closed in a layered fashion, making sure to re-approximate the extensor retinaculum and subcutaneous skin. The skin is closed in a tension-free manner, using non-braided suture.
Frame application
For ankle and TTC arthrodesis, a thorough understanding of cross-sectional anatomy of distal lower extremity is paramount for safe use of transosseous fixation. In general, I recommend the use of 1.8mm thin wires and 5mm or 6mm HA-coated pins for ankle and TTC external fixator arthrodesis.
Fixation in the foot
I generally prefer to place the Foot Ring first, with the tibia Ring or Ring block slid up the leg and placed second. An orthogonally placed long Foot Ring that matches the size of the patient’s anatomy is placed first.
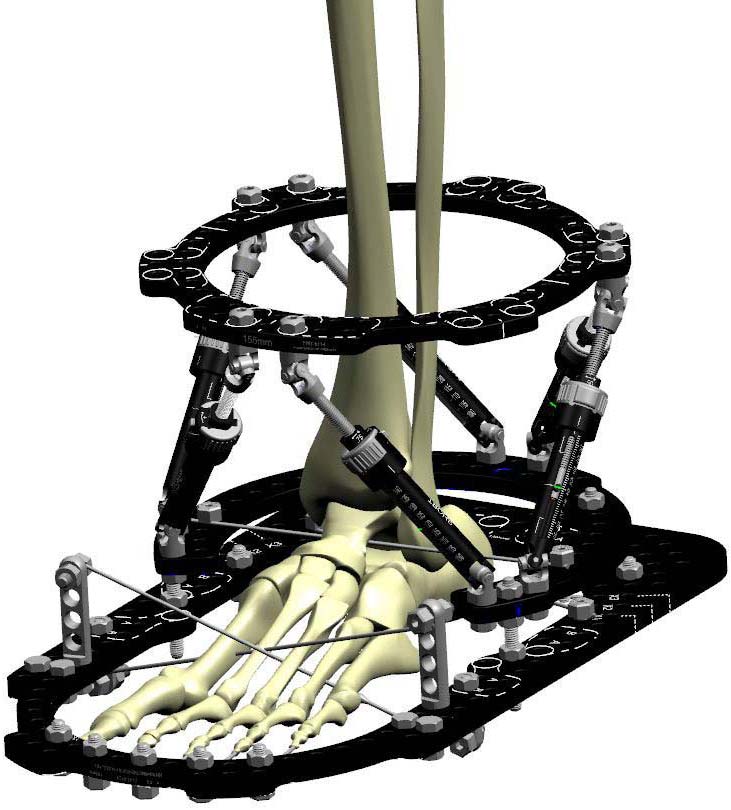
With a two-finger breadth distance between the back of the heel skin and the inner surface of the Foot Ring, I place two oblique transosseous Olive Wires through the calcaneus (Figure 2a). The first is placed posteromedial to anterolateral, and the second is placed posterolateral to anteromedial. The olives should be on opposite sides of the calcaneus to maximize stability. Also, in order to maximize stability, one calcaneal Olive Wire should be placed above the foot plate, and the second wire placed below the foot plate.
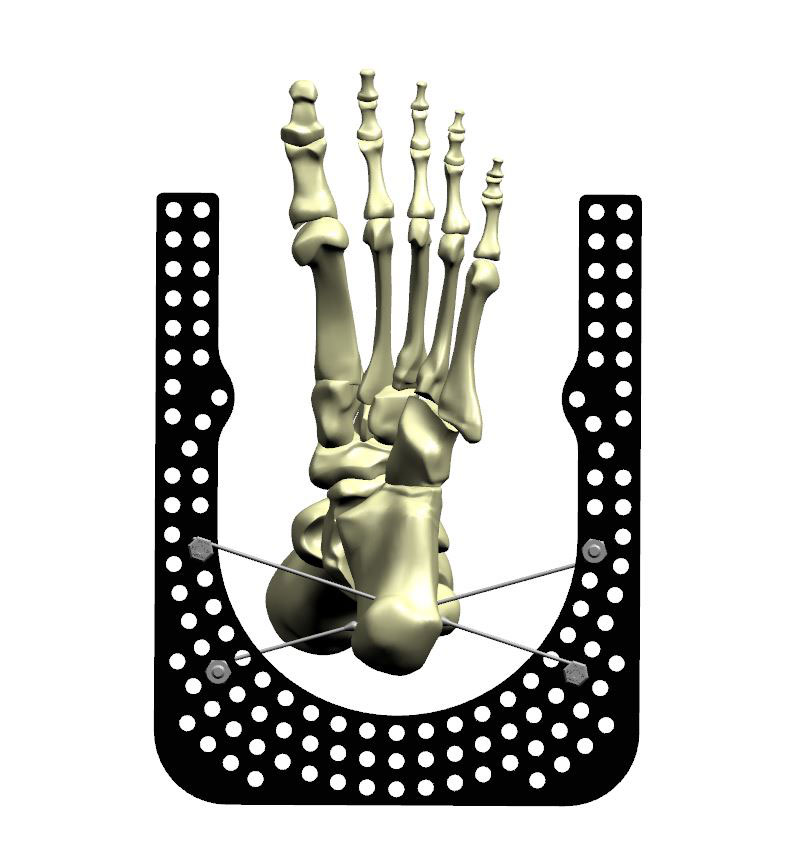
I recommend one transosseous smooth or Olive Wire traversing the first and second metatarsals and one wire traversing the fifth through third (or second) metatarsals. It is not advisable to attempt to capture all five metatarsals with a single wire, as this can lead to unwanted flattening of the normal cascade of the forefoot (Figure 2b).
I also place a third midfoot wire through the cuneiforms and possibly capturing the cuboid (Figure 2c). Be sure during wire placement to avoid placing wires in locations where connection to the Foot Ring will interfere with Strut placement. Dashed lines indicate options for Strut Mount other than default.
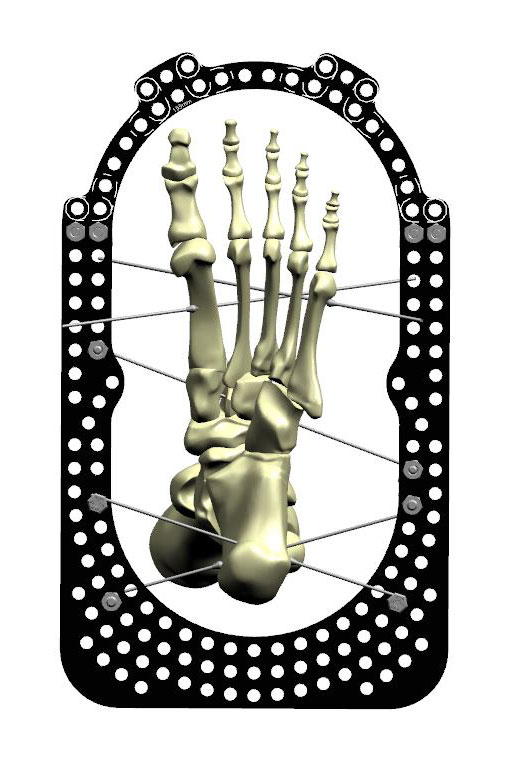
Once attached, the orthogonal Foot Ring should bisect the medial and lateral columns of the foot as you look at it clinically, and the center of the Ring should line up with the lateral border of the second metatarsal (Figure 2d). Once the wires are placed, close the foot plate with a size-matched Half-Ring, and tension the wires to 50-90kg tension. It is critical to tension wires only after closure of the ring.
Isolated tibiotalar arthodesis
If I am performing a TTC arthrodesis, no dedicated fixation in the talus is required at this point, as we will be axially compressing across the entire subtalar and tibiotalar joint axis. If, however, I am performing an isolated tibiotalar arthrodesis, the talus will require fixation in order to isolate the tibiotalar joint from the rest of the foot.
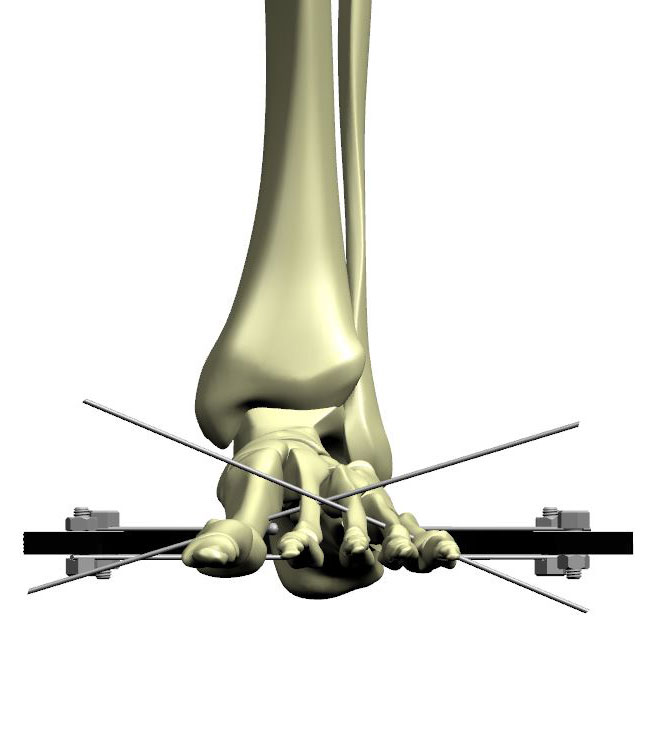
There are two techniques to perform this: a “drop” wire or an isolated talar intermediate Ring (Figure 3a). I prefer the intermediate Ring technique because it allows me to attach the foot wires to the Foot Ring without any concern for where Struts will be placed.
In this technique, I first line up a 2/3 Ring, open anteriorly, centered on the talus at or just above the level of the lateral process. A medial to lateral Olive Wire is then placed under direct AP fluoroscopy. This wire should be parallel to the previously placed orthogonal Foot Ring and tibiotalar joint, and is generally perpendicular to the anatomic axis of the tibia above unless there is a malalignment deformity. The wire is attached to the anterior open 2/3 Ring. The center of the ring is ideally correspondent to the center of the tibiotalar joint on AP and lateral radiographs (Figure 3b). After tensioning the wire, this open 2/3 ring is attached to the orthogonal Foot Ring below with four Threaded Rods. If there is a parallelism mismatch between the Foot Ring and talar intermediate Ring, Conical Washers can be used to offset any subtle mismatch.
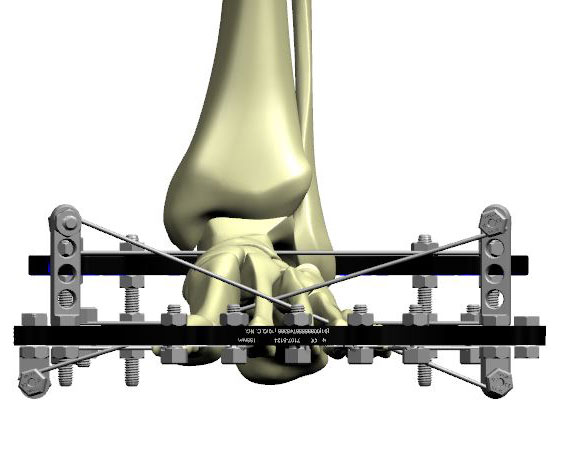
Struts will be connected from the tibial Ring to the intermediate 2/3 Ring around the talus (Figures 3c and 3d).
With the “drop” wire technique, the same talus Olive Wire is placed; however, it is attached directly to the Foot Ring using appropriate length Posts and Wire Fixation Bolts. I find this technique to be more cumbersome in terms of fixation crowding and later Strut placement, hence prefer the talar intermediate Ring strategy.
Fixation in the tibia
For the purposes of ankle and TTC arthrodesis, I generally recommend a one- or two-Ring proximal tibial block. For a two-Ring block, the block is pre-built, with the Rings connected by Threaded Rods or Sockets, evenly spaced over the circumference of the Rings.
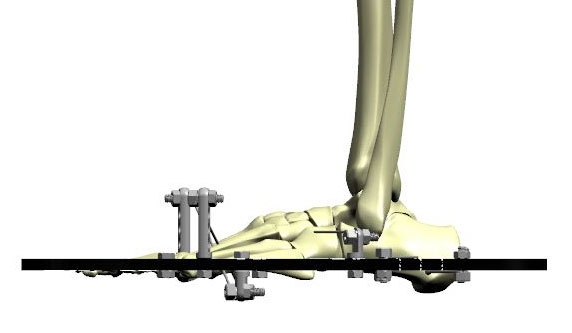
The most proximal Ring in the tibial block is generally placed just distal to the midshaft of the tibia (Figure 4a). The distal Ring in the tibial block is generally placed in the distal third of the tibia, well proximal to the metaphyseal flare. The advantage of a two-Ring block is that typically only three HA-Coated Pins can be placed from a single ring. Using two Rings, separated by short Threaded Rods or Sockets, allows for comfortable placement of up to five HA-Coated Pins in multiple orientations with excellent pin spread. Not only does this provide more stability, but should one of the half pins develop loosening or infection, it can be safely removed without losing stability of the frame.
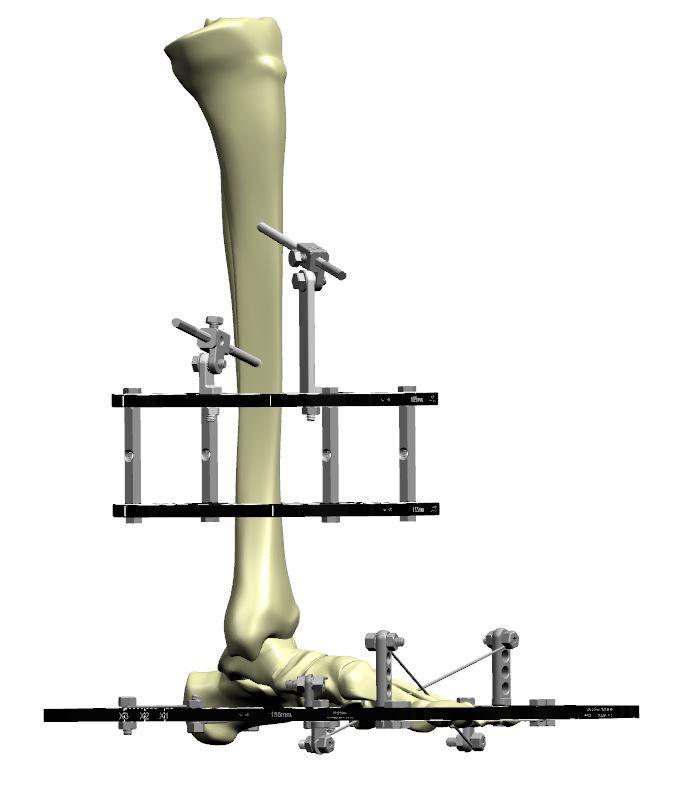
The pins are pre-drilled with continuous irrigation to limit thermal necrosis of the bone.
One pin is placed anteromedially in the flat medial face of the tibia, built off the top Ring with an 85mm Angled Pin Connector directed 30-45° toward the proximal tibia. A second pin is placed medial to lateral in the tibia using a 35mm Angled Pin Connector. Finally, a third pin is placed anteriorally, below the Ring using a 1H Rancho (Figure 4b).
I typically do not place a reference wire to establish orthogonal Ring placement. Angled Pin Connectors obviate the need to use a reference wire. However, if the reference wire technique is used to establish an orthogonal tibia Ring or Ring block, I generally remove it at the end of the case.
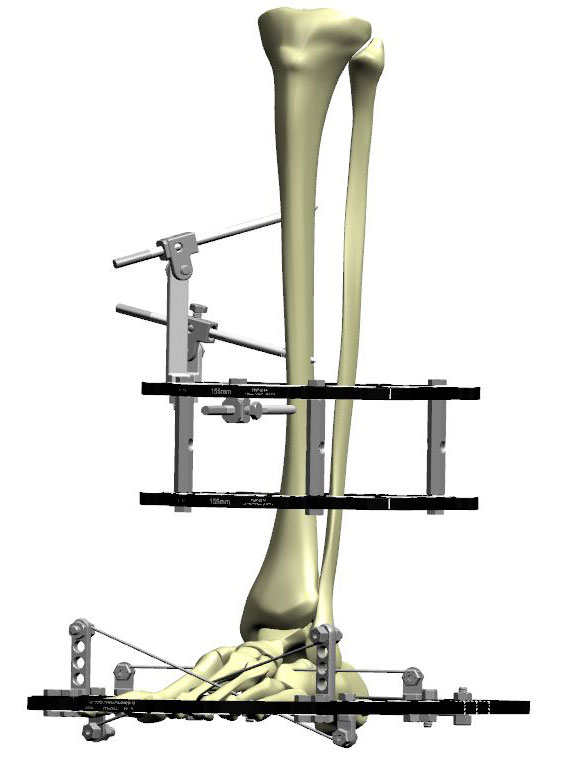
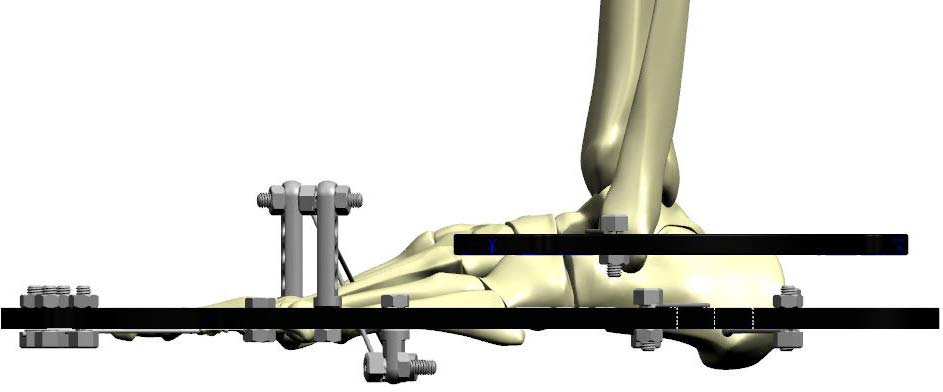
On the bottom Ring, from which the six Struts will be attached, I place
- One HA Pin anteromedially through a 6mm Pin Fixation Bolt on top of the Ring
- A second anterior pin off a 3H or 4H Rancho Cube or 35mm Angled Pin Connector below the Ring on the inner tab, between the anticipated Struts #1 and #2 (Figure 5a).
Care must be taken to identify the tibialis anterior tendon and protect it during placement of this distal-most anterior pin.
At this point, the tibial block has been established and can be attached to the foot and ankle construct with six Struts.

Ideally, the spacing between the tibia block and the foot block is such that six Medium or Short Struts can be placed with initial Strut settings in the middle of the Struts’ ranges (Figure 5b). This will minimize need for Strut changes in clinic.
I will generally at this point remove the previously placed Steinman pin and manually compress the ankle joint (and subtalar joint if performing TTC fusion) acutely in the operating room before locking all the Struts. Alternatively, if the Steinmann pin placed longitudinally for provisional fixation is directly perpendicular to the arthrodesis site, then it can be used as a “rail” during compression.
Tips and tricks
- Allow adequate space for the calf so that the proximal Ring does not impinge on the soft tissues. One common mistake is to attach the proximal Ring with the bump behind the calf to suspend the leg with no regard for where the calf will be once the bump is removed. If not assessed proactively, the Ring will impinge on the calf, necessitating removal of the Ring and potential repositioning of fixation.
- Allow adequate room between the posterior heel and the Foot Ring. This space does not need to be more than 2cm, as virtually no swelling occurs posteriorly at the calcaneus, irrespective of how extensive the surgery is. However, with direct contact of the Foot Ring to the calcaneus, the frame potentially may need to be disassembled and remounted in its entirety.
- Be sure the actual foot is slightly plantar to the Foot Ring. The plantar foot pad is thicker than it appears, and if the Foot Ring is positioned too distally, it will not be possible to pass the wires through the bones of the foot, only the plantar soft tissues.
Post-operative
There is no consensus on proper pin management. I allow simple showers with soap after all surgical incisions are healed. In rare cases, I will recommend anti-microbial soap and cotton-tipped applicators for additional pin care. If a pin tract should become infected and fails to respond to proper pin care and oral antibiotic management, the involved pin will need to be removed and replaced with a different pin in a minor operative procedure.
Ankle arthrodesis, regardless of technique, may go on to delayed union, nonunion, and malunion. Generally, delayed union is effectively managed with further compression applied to the arthrodesis site in the office setting, with or without a software program. The risk of malunion (equinus, varus, and excessive valgus), as for arthrodesis using internal fixation, is typically avoided by proper intraoperative positioning of the ankle joint. The advantage of circular fixation is that subtle adjustments are still possible post-operatively. After frame removal, the patient should be protected in a walking cast, boot or brace until the tibial pin sites have healed. With the stiffness at the ankle arthrodesis site, immediate full weight bearing after frame removal may lead to stress fracture through a tibial pin site.
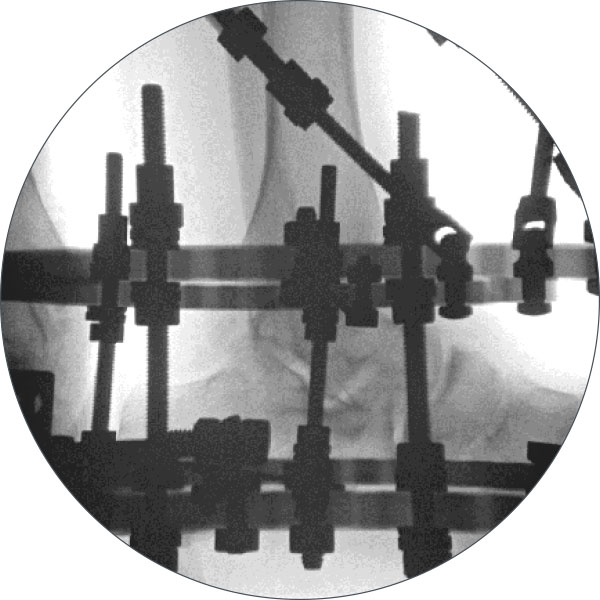
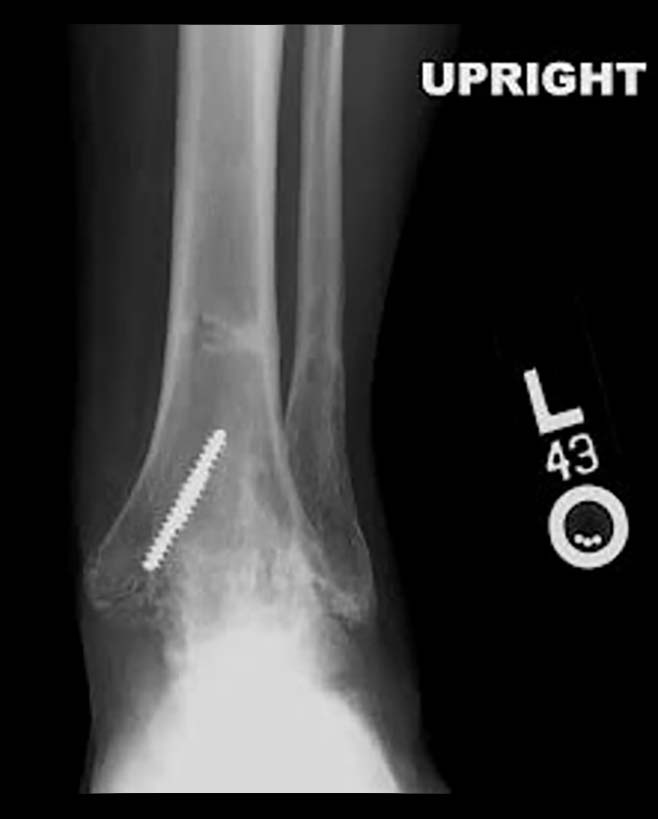
Case example

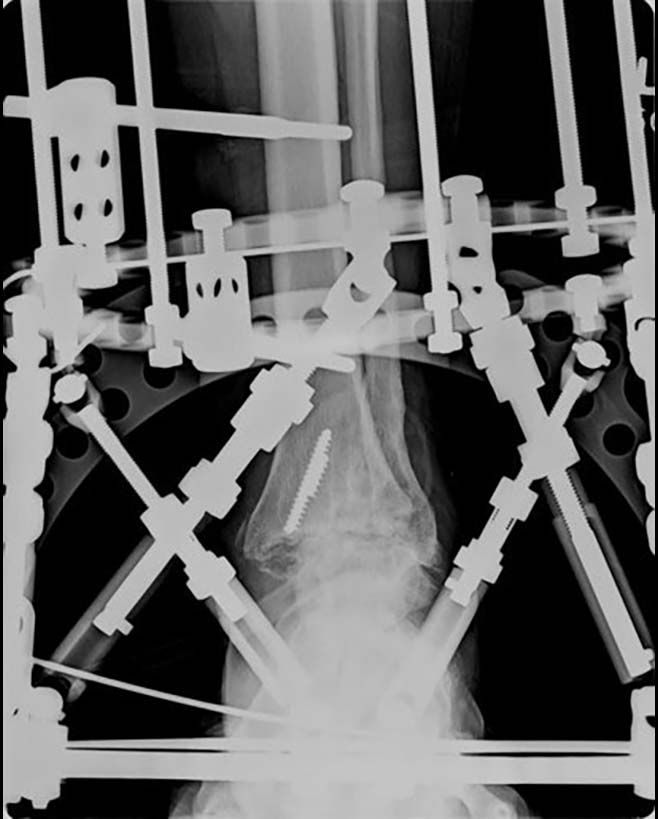
post-op day 5
References
- Fragomen AT, Borst E, Schachter L, Lyman S, Rozbruch SR. Complex ankle arthrodesis using the Ilizarov method yields high rate of fusion. Clin Orthop Relat Res. 2012;470:2864-73.
- Easley ME, Montijo HE, Wilson JB, Fitch RD, Nunley JA. Revision tibiotalar arthrodesis. J Bone Joint Surg (Am). 2008;90:1212-1223.
Suggested Videos